BigBlueButton
Version: 1.39 for BigBlueButton version 2.4 - updated June 2024
APC has used BigBlueButton as the main tool for online meetings since 2020. We opened a instance up fo apc members and network to use some years ago and it is available at connect.members.apc.org.
We compiled this manual to make it easy for everyone to use the platform.
Table of Contents
Use BigBlueButton as a meeting organizer or facilitator
- Obtain an account
- Sign in
- Use your personal room
- Create a new room
- Joining the meeting
- Recording the meeting
- Working with presentations
- Configuring the Video Layout
- Sharing an external video
- Sharing the screen
- Start a poll
- Breakout rooms
- Chat
- Notes
- Locking participants
- End the meeting
- Learning analytics
- Closed captioning
- Activate interpretation
- Assign interpreters
- Interpretation tips
- Useful slide to share at events
About
APC is using BigBlueButton as the main tool for online meetings since 2020. APC's Zoom accounts are still active and are available only for meetings with more than 60 participants, or meetings with 25 or more active cameras.
This manual
This manual is organized in three sections based on users' main roles.
Note on performance
The quality of the meeting's video and sound depend on various factors like the power/capacity of your device and the speed of your internet connection.
We recommend:
- Close browser tabs and windows you are not using.
- Avoid streaming music or videos while on the call, as they make your internet connection to BigBlueButton server slower.
- Use a network cable from your computer to your router as it offers faster and more stable connection than WiFi.
- Close programs you are not using.
Use BigBlueButton as a participant
Joining the meeting as participant
To use BigBlueButton you won't need an app because it runs in the browser.
Open the link that was shared with you in your web browser. Use the browser of your choice (it should work with any), on your computer, tablet or mobile phone.
We know there might be some hiccups with some browsers, especially on phones because each Android manufacturer deals with web browsing differently (in general when a phone goes to "sleep" the browser usually stops working, iPhone should work fine though). So, if you encounter problems, please be ready to re-enter the session with another browser/device.
Remember never to hit the BACK button in the browser, or you will leave the meeting!*
When joining a meeting protected with an access code, you will need to enter it before you can join (use the access code you got in the invitation).
Write your name (the name you want to use during the meeting).
To change the name after you have joined, leave the meeting, open the link for the meeting and join with a preferred name.
When you join, your browser will ask you to enable microphone and a private echo test will be initiated.
You will be able to test your microphone (and nobody in the meeting will be able to hear what you are saying during the echo test).
If you hear yourself it means that everything works and you can confirm it by clicking on Yes button. Sometimes it also helps to disconnect and connect in your headset while in echo test.
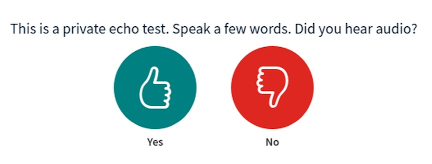
You can use headsets but some operating systems might have "drivers" issues, especially wireless ones. If that happens use another set of headsets or the internal audio/microphone of your computer.
If you don't hear yourself or hear noise, select No and you will be able to change your audio settings.
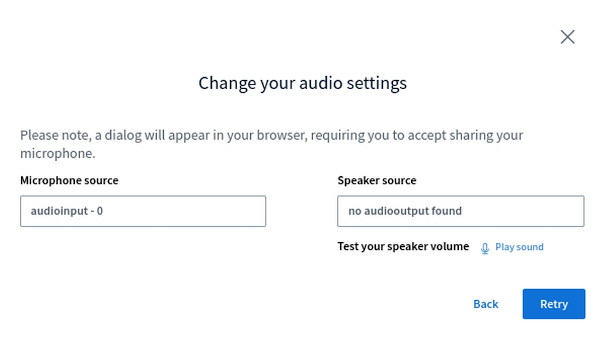
Next you will join the room.
If you encounter audio issues during the session (others can't hear you or you can't hear them) click on the small arrow at the bottom of the speaker icon. It will display your available audio devices, next select a different one.
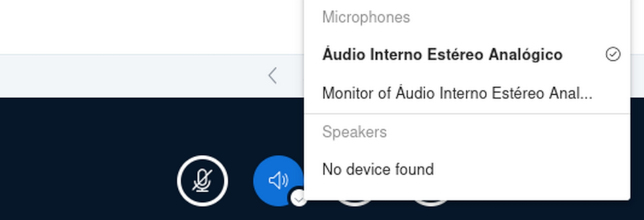
If this does not help, click on speaker icon itself and select Leave audio and then click on it again to join audio and select a different microphone or speaker.

The main screen
When you join the meeting, feel free to explore the options.
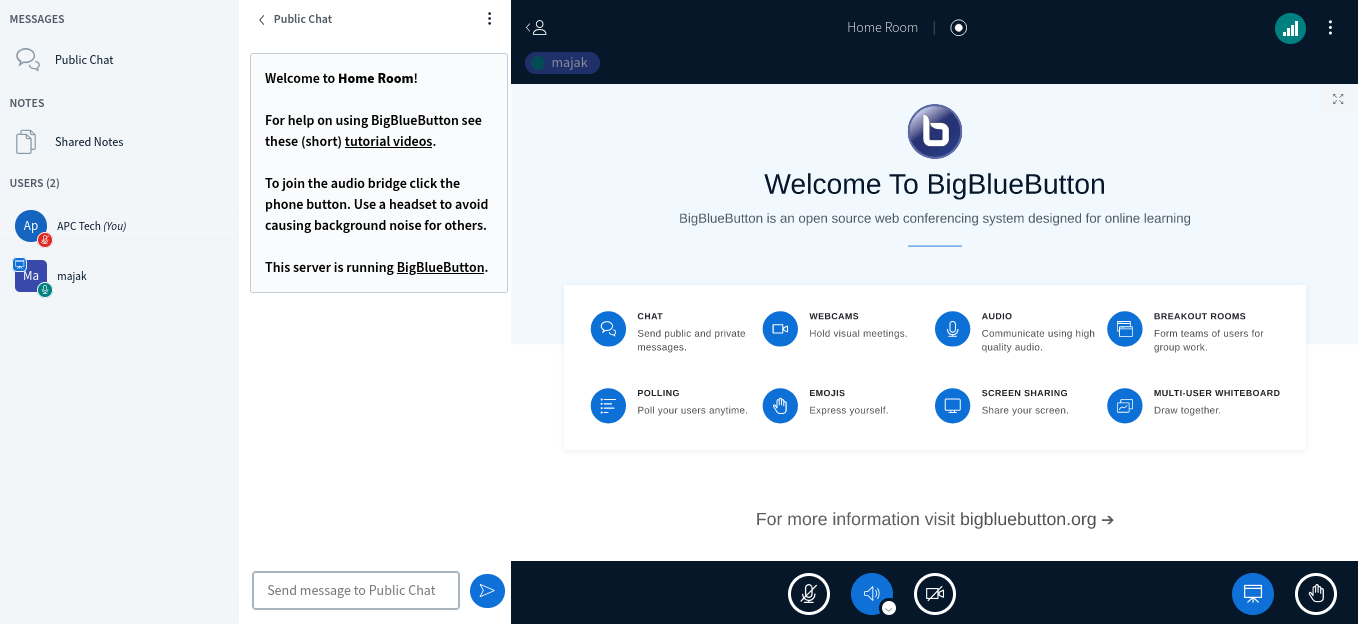
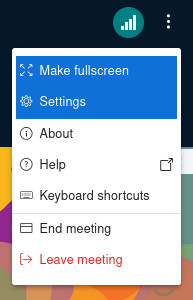
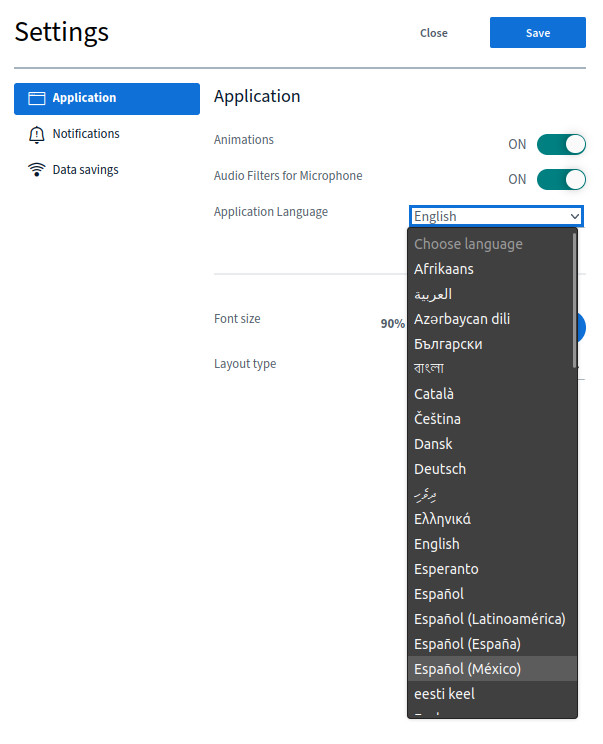
If you need to change the interface language, click on the three small dots in the top right corner of your screen, select Settings and change the Application Language.
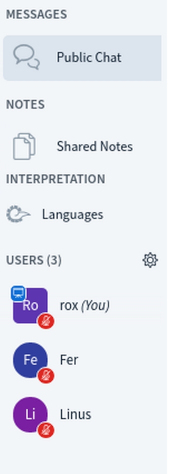
On the left side of the screen you can see sidebar with:
- public chat
- access to the shared notes of the meeting
- interpretation options (if enabled) and
- the list of participants
The menu at the center bottom can show different things according to the setup. Most often you will use mute/unmute button, leave/join audio (hear only or reconnect with another device), share webcam or share your screen. Some buttons might (not) be visible due to the settings of the room, and depending on your role (meeting organizer, presenter or participant). Additional buttons will appear when closed captioning or interpretation are enabled.
Personal setup
In the menu at the top right of the screen you can also configure some of your personal preferences by selecting Settings.
Under the Application, you can disable animations, audio filters for microphone, the application language, font size and layout type.
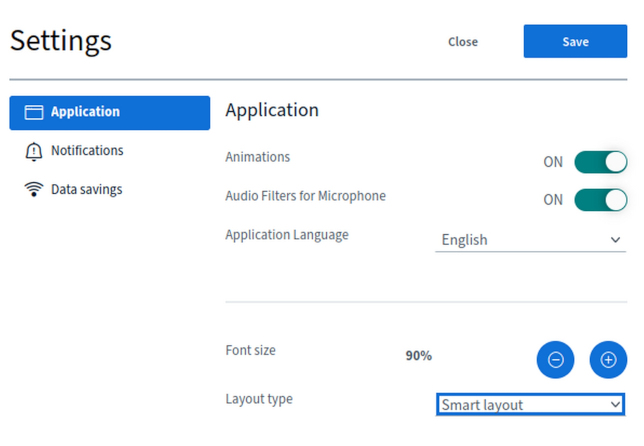
Layout type defines the overall look of the meeting. In older versions of BigBlueButton the layout of the meeting could be changed directly in the main view, now there are several preset options such as Smart Layout, the default choice, Custom, Focus on Presentation and Focus on Video. (For more info check Video Layout section below).
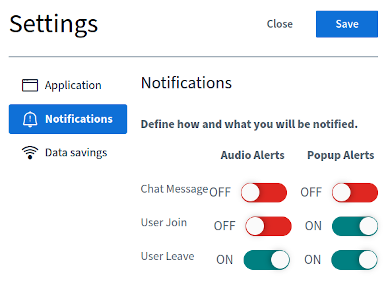
Under Notifications, you can set alerts for new chat messages, users joining and leaving the meeting. The alerts can be an audio ping, a pop-up banner or both.
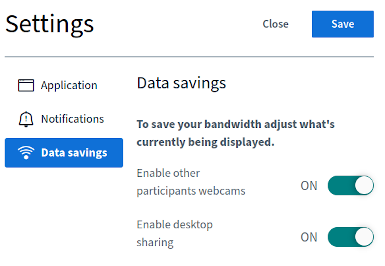
Under Data savings you can save some data traffic by disabling participants webcams or presentation (it will affect only what you see on the screen, not what they are broadcasting to the rest of the participants).
Enabeling data savings is useful when your connection is slow or when you are on your mobile phone with limited data plan.
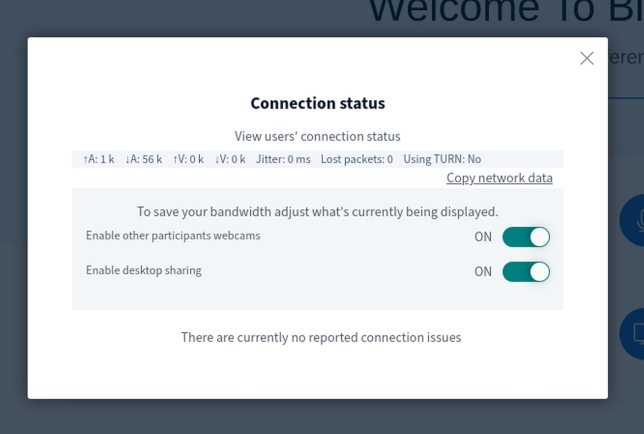
A green connection status icon at the top right of your screen shows you have a good connection. If it is red or violet, your bandwidth is not very good.

To make the most of the limited data click ok on the icon and disable other participants' webcams and/or screen sharing.
User list
You can see a list of users participating in the call on the left hand side of the screen.
There are three types of participants:
moderatorswith square iconsparticipantswith a circle iconpresenteronly one moderator or participant can be a presenter at the same time and they have a little presentation icon attached to their square or circle icon
Your own name will be the first.
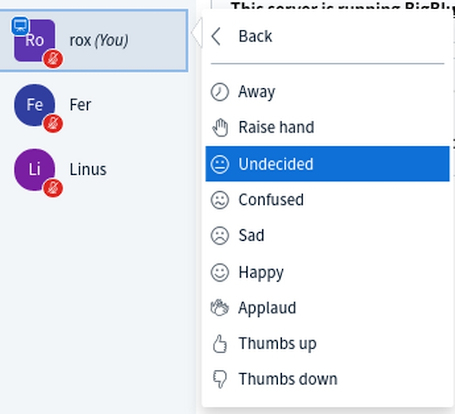
To set the status click on your icon and select status. Status will then be displayed inside your icon. This can indicate how you feel about the meeting. There you can also select "Raise hand" (although more accessible Raise hand icon is at the bottom right of the screen).
User's list also indicates if they joined in listen only mode, if their microphone is muted or unmuted or if their audio is disabled, and if their webcam is on.
By clicking on other people's names and selecting Start a Private Chat you can initiate a private conversation just between you and them. This works even if the person is in another breakout room.
A meeting moderator can see other functionalities to manage participants and room features (i.e. to make someone a presenter, promote to moderator, give whiteboard access, removing user etc). See section for meeting organizers for more details.
Video layout
BigBlueButton offers several preset options for displaying the webcams and presentation in a meeting. Layouts can be changed in the personal Settings (see section Personal Setup), and the options available are:
Focus on Presentation: groups all webcams below the chat and presentation is taking all available space.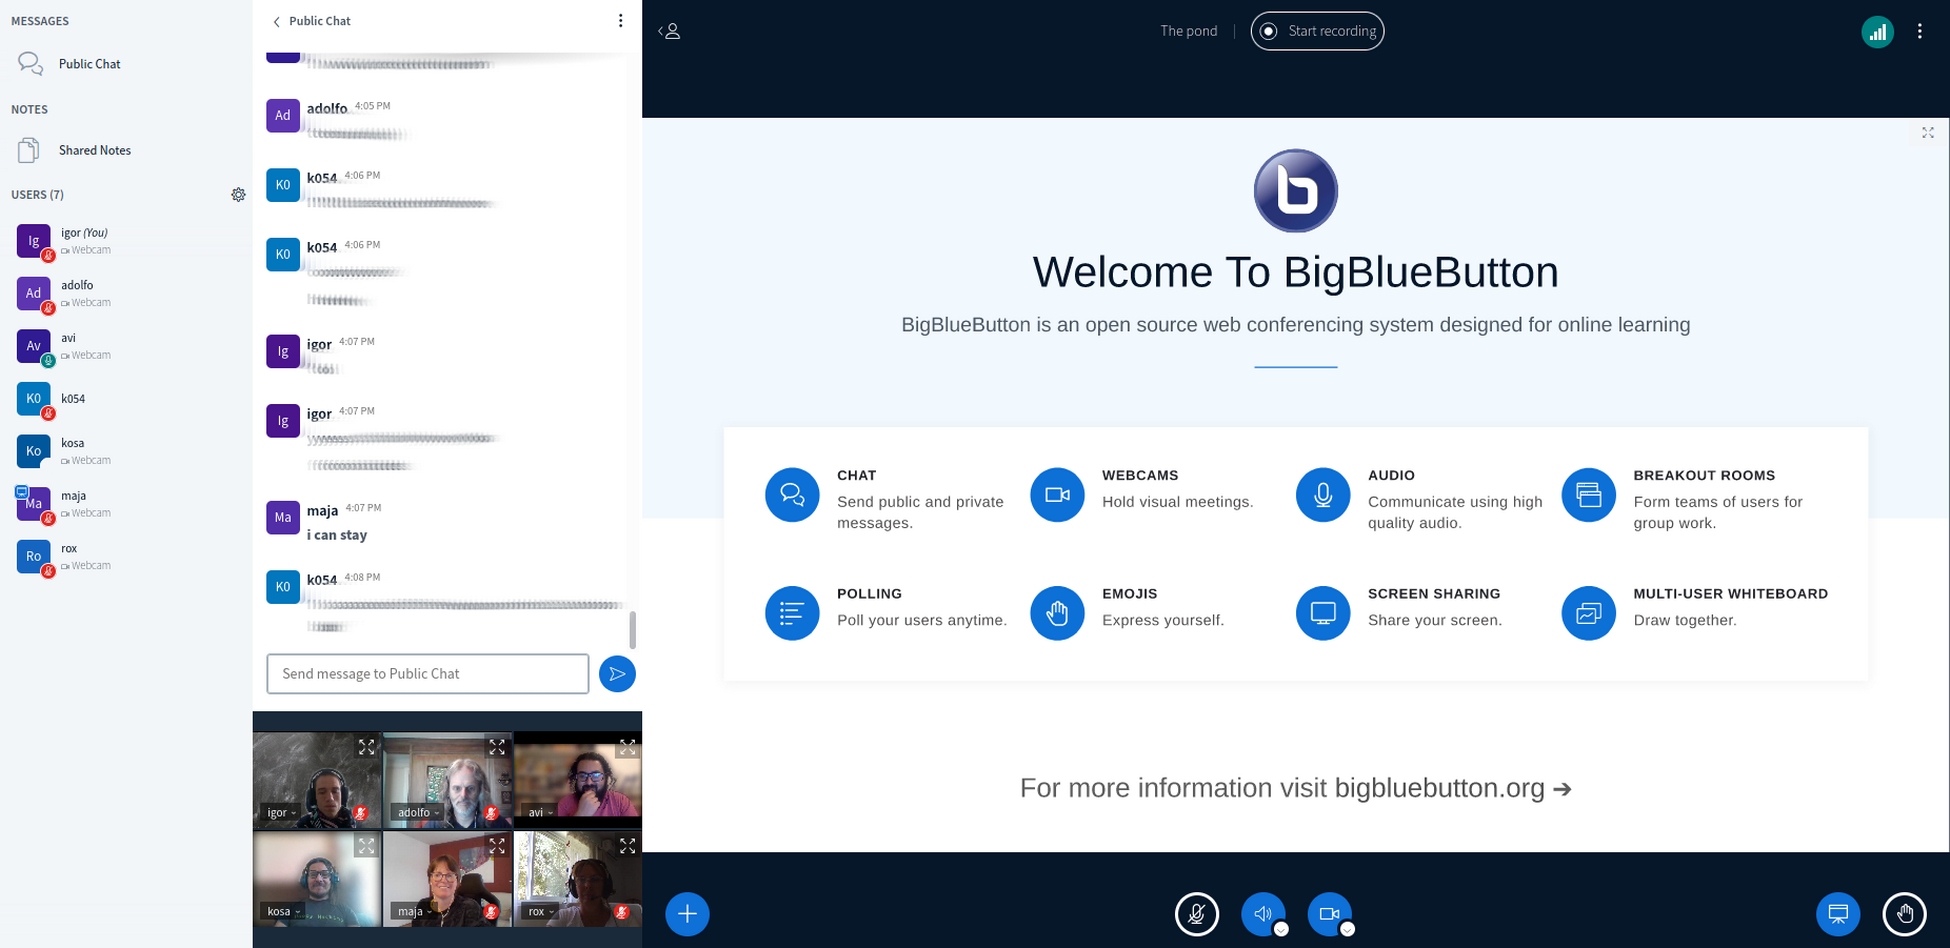
- Focus on Video`: puts the presentation below the chat and gives main area to the webcams.
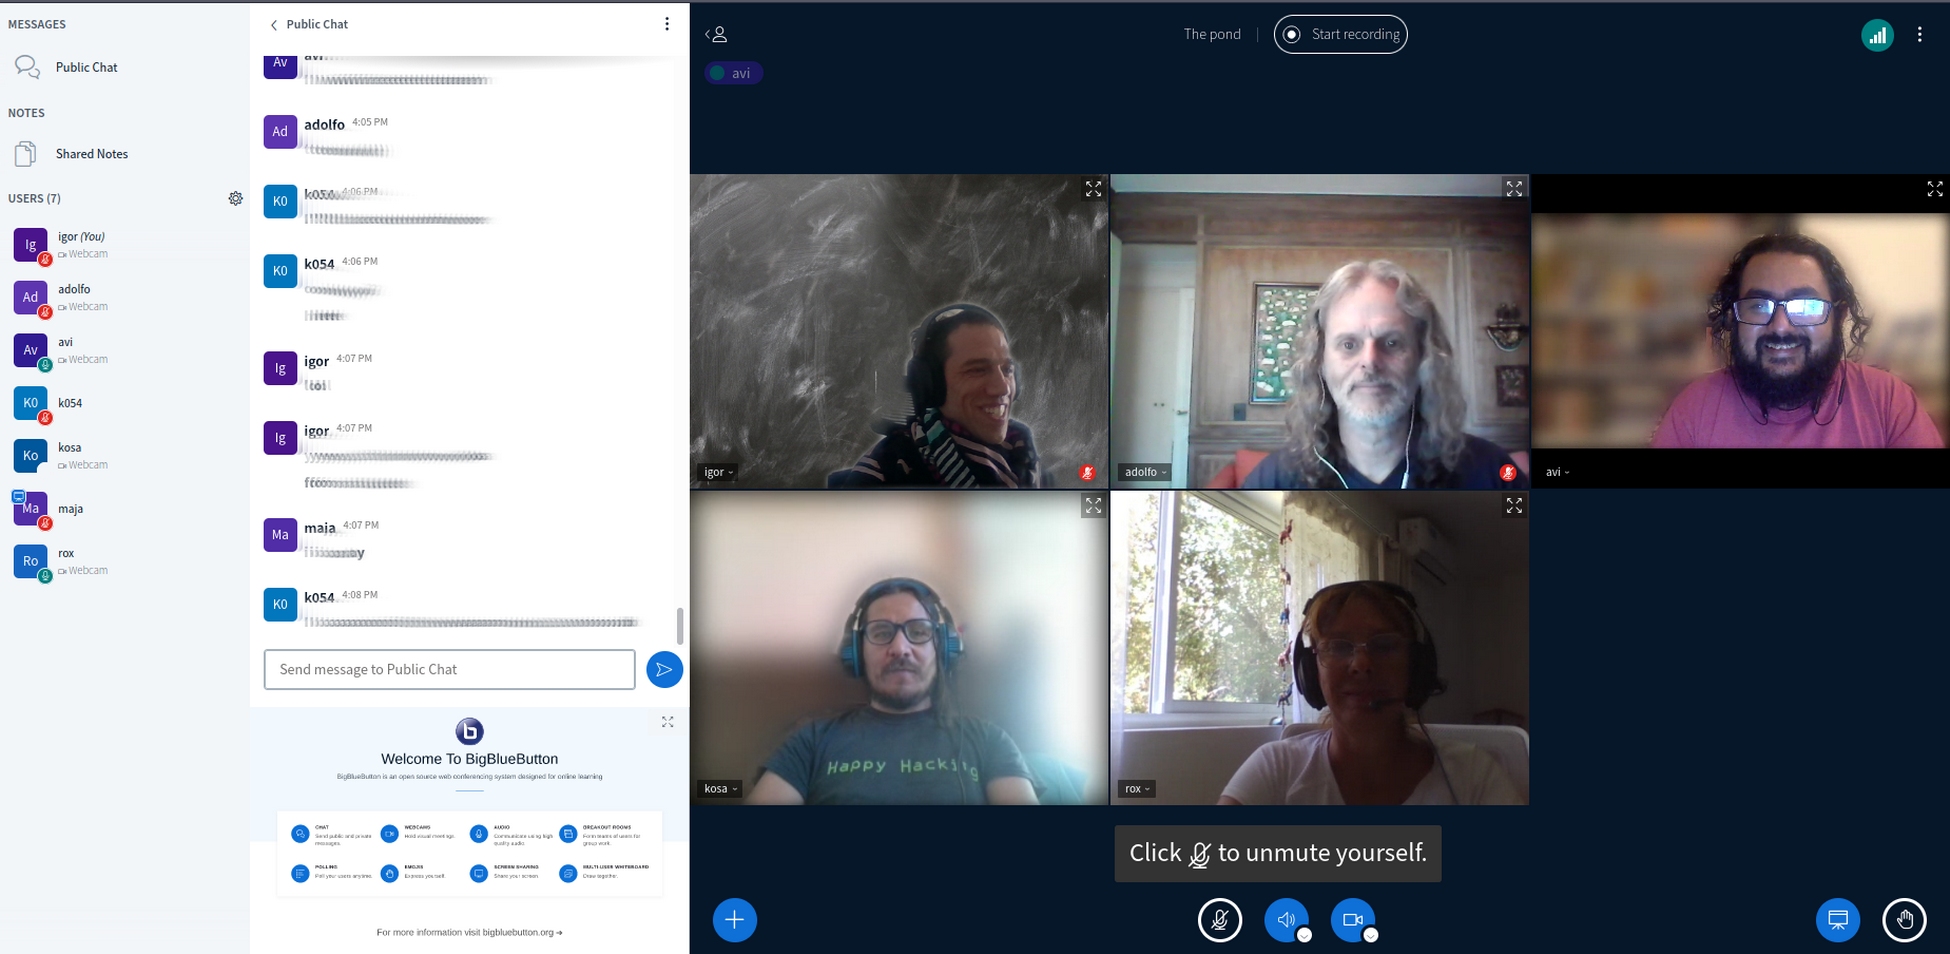
Custom: allows you to move the webcams column, snapping it in place on either the sides or at the bottom of the presentation, or below the chat. This layout also allows you to reduce the size of the space reserved for the presentation or the camera column. Picture shows "Custom" layout with webcams snapped on the left side of the presentation.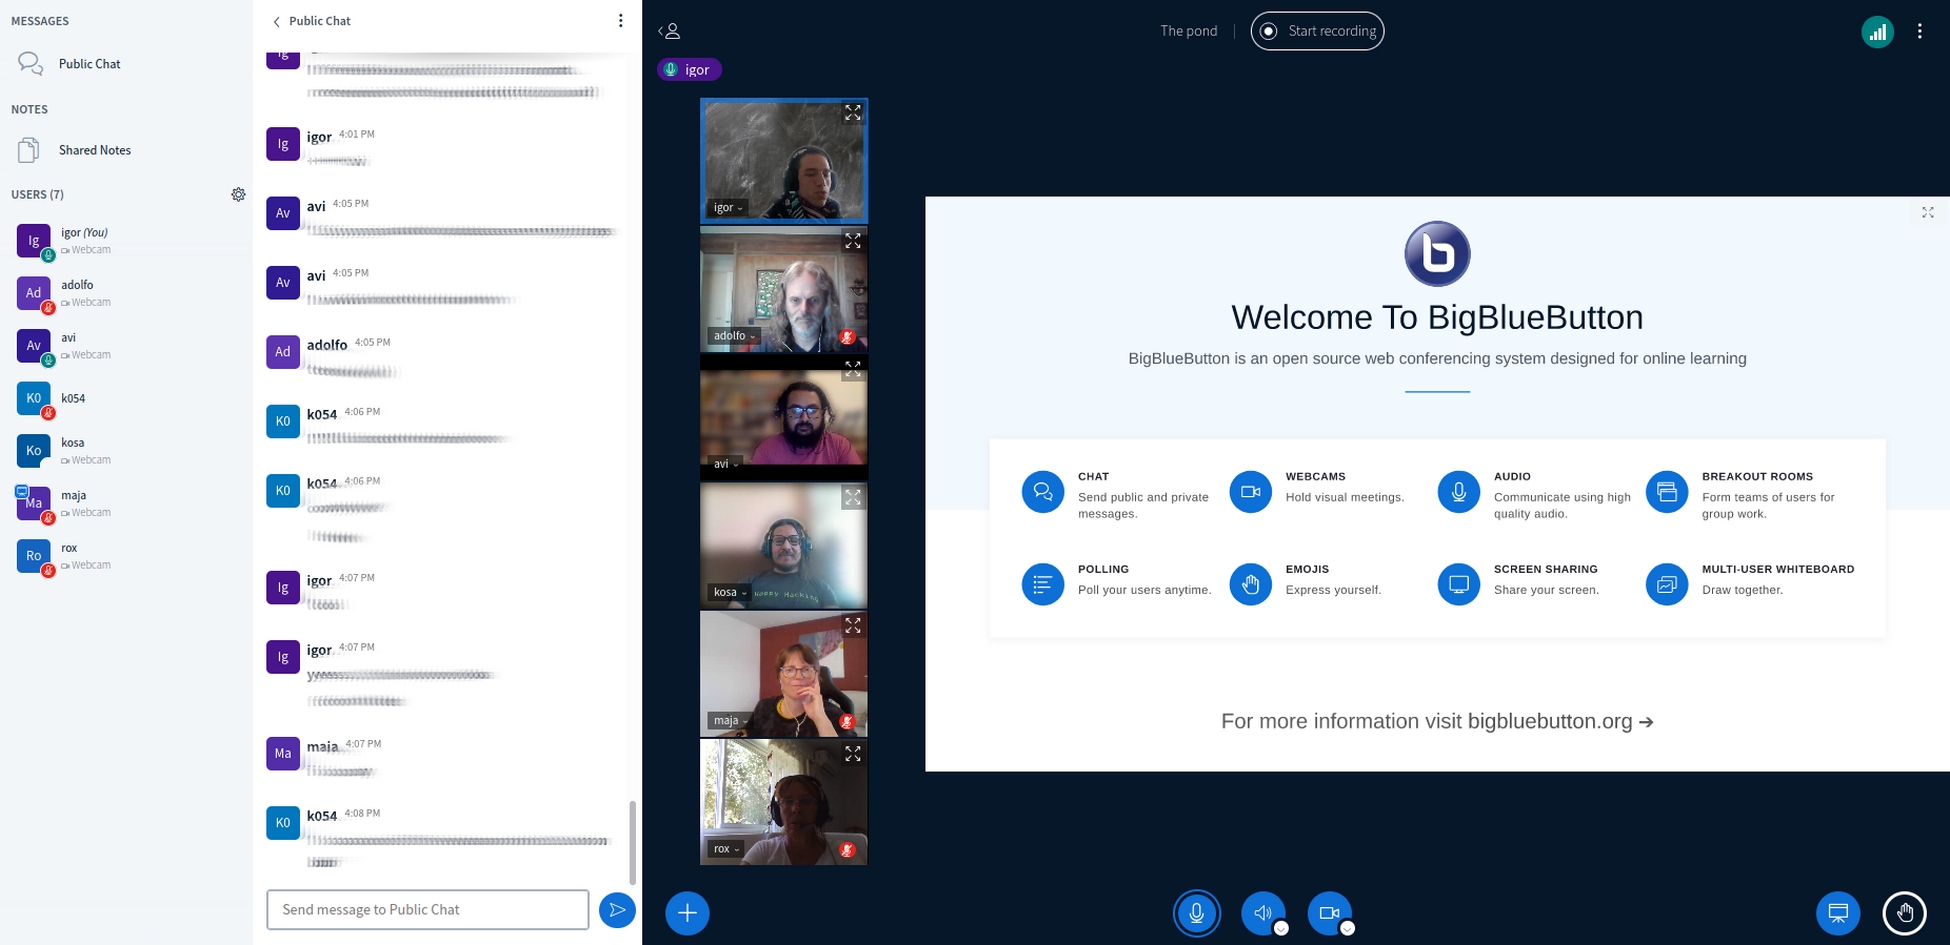
Smart Layout: optimizes itself depending on the meeting, what is being shown and who is speaing.
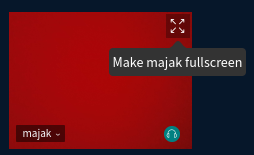
In all layouts it is possible to maximize one of the cameras by clicking the top left icon of arrows Make fullscreen.
Chat for organizers
Chat functions the same as on other platforms, so we will only mention additional functions that you might need.
In the chat you can write only plain text, but you can use emoticons like :)
You can initiate private chats with other participants or moderators of the meeting by clicking on their name and selecting Start a private chat. Private chats wor even if participants are in different breakout rooms.

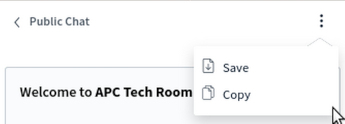
Selecting menu in the top right corner of the chat will give you the option to save the chat (in .txt format) or copy the contents (to the clipboard).
Raising your hand

If you click the Raise hand icon on the lower right corner, moderators will be aware that you are requesting to participate. Also, your name will show first in the participants list.

Once clicked, the icon will change color, click again to lower the hand.
Hide your background
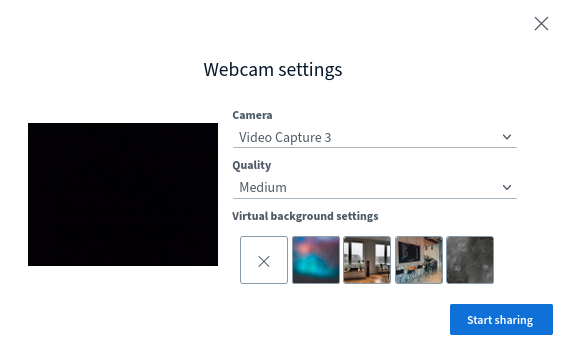
Since version 2.4 BigBlueButton offers an option to hide your background. When clicking on the webcam icon a pop-up with the preview of your video will show up. In the dialog you will be able to chose which camera to use (if more than one is available), the quality of the video stream and a virtual background. The first one blurs your background and others add a background image.
Joining breakout rooms
Breakout rooms are additional sub-rooms that can be created at a meeting.
Meeting organizers can create breakout rooms and assign participants to a certain room, or offer the possibility to select which one participants join. When rooms are created, participants assigned to a room will receive an invite similar to:

When you click Join room button it will open another tab in your browser with a breakout room and mute you in the main room.
When the breakout room ends (they have a time limit) or you leave it, you will automatically be brought back to the main room.
Meeting recommendations
We ask that all participants follow suggestions below:
- Test your audio and video in advance. We will open meetings at least 10 minutes prior to the start time in order to help participants with any sound/camera issues.
- Use headphones to connect your device (laptop or phone) in order to reduce the echo.
- Use a wired microphone instead of a bluetooth microphone.
- Keep your microphone on mute when you are not speaking. This is essential in order to reduce background noise and ensure that everyone can hear the speaker/facilitator during the meeting. Also be mindful of who/what can be heard in your background.
- Mute or turn off any other devices/distractions.
- If you use the camera be mindful who/what can be seen in the background. If your internet connection is slow you may want to disable the camera.
- For better connection, position yourself closest to your WiFi access point or choose a wired connection.
- Refrain from doing other things on your computer/phone during the call. Close other applications to conserve computer/phone resources and bandwidth.
Use BigBlueButton as a meeting organizer or facilitator
Obtain an account
Contact the tech team to get an account and access to rooms.
Sign in
Access BigBlueButton at https://connect.apc.org
Use your personal room
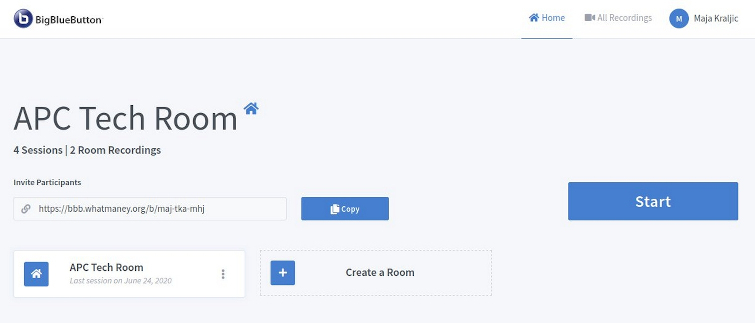
After you log in the main screen will show you a link to your room. To invite other people copy the link and send it via email. When you click on Start button you can already start using it.
If you need a room for a specific event, create a new one (details below).
Also, you can create a meeting directly from Mattermost by clicking on the B icon at the top right corner. The room will reflect the name of the channel where it was created and people in the same channel will be able to join.

Create a new room

When you are organizing an event or external meeting create a new room. You can do this by clicking on a + Create a room button (or contact the tech team for support).
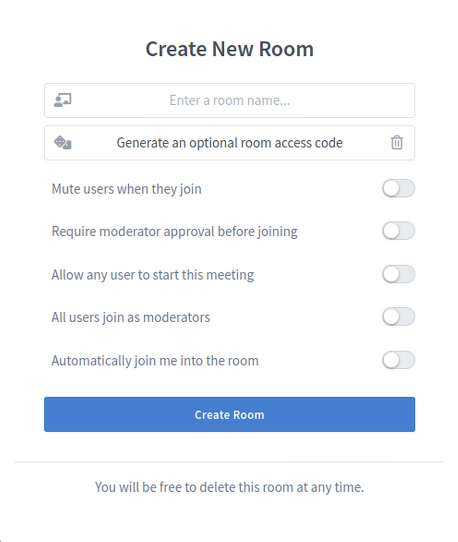
Next you will need to define room details like name of the room, room access code (click on the dice icon) and other optional settings.
There are two levels of room names, one is the room name and the other is the room URL. You can easily rename the room after creating it but in order to change the room URL you will need to contact tech.*
Joining the meeting as organizer
Meeting organizers join BigBlueButton rooms they own as moderators.
The first moderator in the room becomes the presenter. If you are moderator you can take presenter role from another person. If you are not a moderator, an existing moderator can give you that role.
You will need to be presenter to perform some of the actions explained in this section.
Recording the meeting and accessing the recording

Moderators of the room will see a button Start recording at the top of the meeting room. To record, click on the button.

A pop-up will notify you that you can pause the recording and resume it later. Click Yes and Start recording button will show a red dot an indicator of the length of the recording.

To stop recording, click on the button again.
After the pop-up notification your recording will be stopped and the button will change to display Resume recording, clicking on the button will resume the recording from where it stopped.

After you end the meeting (close the tab and all participants leave the room) the recording will become available on your main room page. It usually takes a few minutes for the recording to become available (contact tech if it takes more than 1 hour)

Under Visibility, you can define who can access this recording:
Unlisted: the default - people with a BigBlueButton account can access the recording via link 'Presentation'Public: the recording will also be listed on the public start-page of your online meeting room for anyoneInaccessible: The recording exists, but no one can access it via the Internet.
Also, the meeting is available in two formats:
Presentation format: it contains sound, video, notes and chat replica that contains the whole meeting.Video format: you can download the meeting in a self-contained MP4 file.
In the three-dots menu you have the option to share the links via email or to delete the recording.
Important: If you want to save the video in a local file in your computer in MP4 format, click Video icon and wait for the recording to start showing. Then select the three dot menu and download.
Please note that once deleted the files are not recoverable.
Recordings are not completely private (APC tech team can see them).*
Trick: for saving meeting notes and chat press record button for a second and then stop the recording.
It is possible to record audio using Audio Recorder on Ubuntu. First set up recording tab in pulse audio controller to mirror output. More on how to use audio recorder to record the meeting.
Working with presentations
To upload a presentation you have to have the Presenter role. Ask a moderator to assign it to you or if you are a moderator you can take presenter role by yourself.
BigBlueButton will accept Office documents (.doc .docx .pptx), text documents (.txt), images (.png, .jpg) and Adobe Acrobat documents (.pdf). We recommend converting documents to .pdf prior to uploading for best results. All file formats will be automatically converted to PDF to be shown.
The maximum size is 30 MB or 150 pages per document. You can upload multiple documents into BigBlueButton as long as they are under the size restrictions.
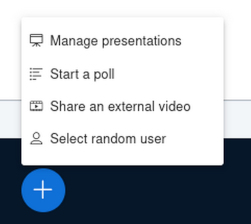
To upload a presentation first click on the big blue + button at the bottom center and then select Manage presentations.
A window where you can upload your presentation will open.
It already has the default presentation on the top of the list and you can add new ones by:
- dropping them on the marked field,
- clicking on the field and selecting them or
- clicking on
or browse for files
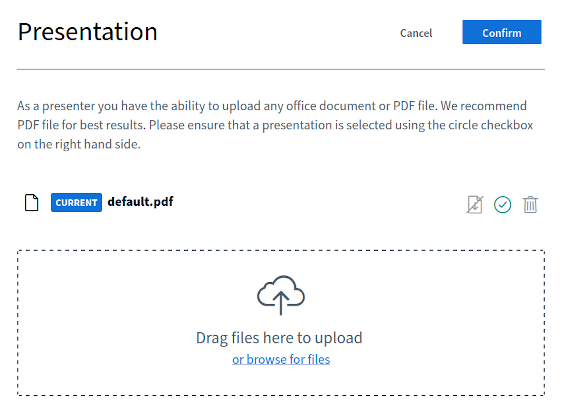
After you select the file, it appears on the list and you need to confirm the upload by clicking on the Upload button.
It will take a few seconds for the presentation to be uploaded and converted to PDF.
We suggest uploading all presentations before the session.
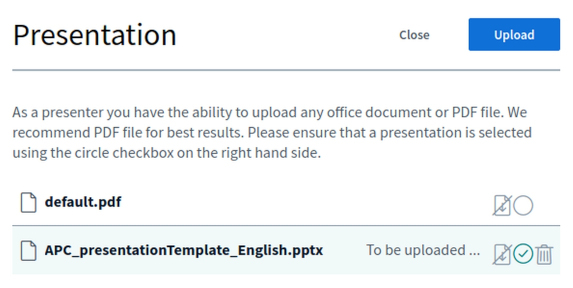
The uploaded presentation will immediately appear in the room (so if you don't want to show it immediately, upload it before the meeting or include an empty slide as slide one).
If you would like to select or upload another presentation, go to big blue + button again and select Upload a presentation. The current presentation has a label CURRENT and a green circle checkbox. To select another presentation click in the empty circle and click button Confirm.
If you would like the participants to be able to download the presentation then enable sharing by clicking on the down arrow icon next to green circle checkbox.

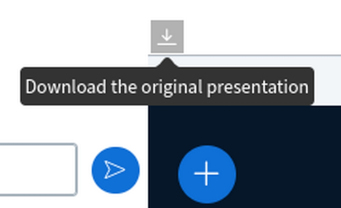
The participants will now have a little download icon available in the bottom left corner of the presentation.
To remove a presentation click on trash can icon.

As a presenter you will be able to use additional features to write and draw over the presentation. Review the available tools by clicking on the hand icon on the left side of presentation.
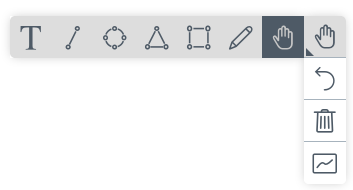
If you are the moderator, you can also make these tools available to other participants. Click on the Multi-user Whiteboard icon at the bottom of the toolbar to enable it.
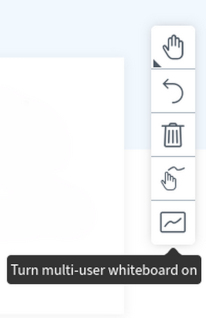
You can also allow individual access to the whiteboard. Instructions available in BigBuleButton support article - How do I use the Per User Whiteboard
All moderators can see and use the presentations loaded by other moderators in the current meeting, which is useful if you are changing roles during the meeting.
Configuring the Video Layout
In BigBlueButton there are different layout options that control how the presentation and video will be displayed. You can read more about the different options in the Video layout section above.
As a moderator you can also select a layout that will be applied as the default one for all participants in the meeting. This can help to have a specific focus depending on the meeting's agenda. Although this layout will be default for all participants, they will be able to change their individual layout if they wish so.
Sharing an external video
To share an external video (available on videos.apc.org, Vimeo, YouTube, Twitch..), click on the big blue + button and select Share an external video in the menu.
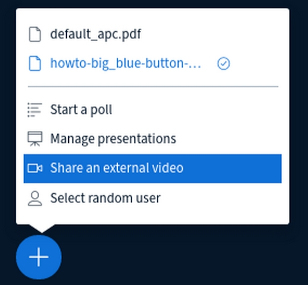
Next, paste the video URL into the text field and click on the button Share a new video. The video will start playing in the main window.
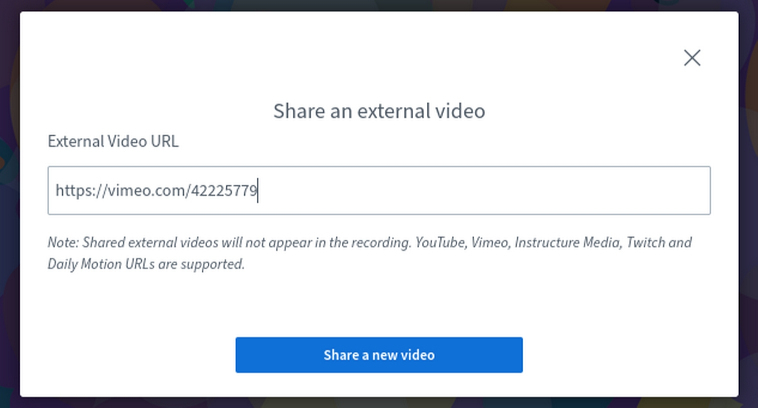
If the video URL is not supported you will be notified. If you would like to show a video uploaded to APC's share, you will first need to upload it to videos.apc.org, Vimeo or YouTube (preferably as Unlisted/Private) and share the newly created link.
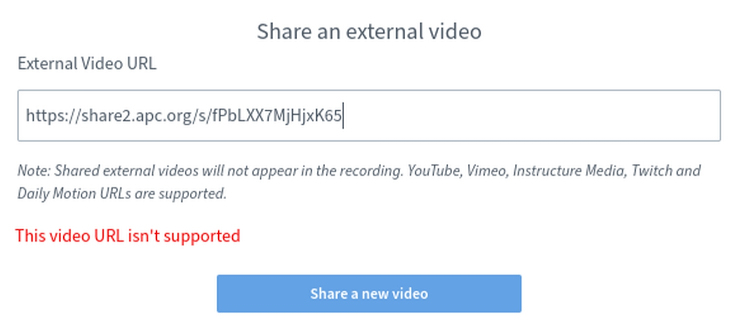
When video starts playing the presenter should mute their audio so that participants don't hear two audio inputs.
Only the presenter can start/stop the video for everybody. Participants and moderators can only mute it, refresh it or make it fullscreen. Sharing the video replaces the presentation and/or whiteboard on the screen.
Participants can pause and mute their own view of a video.
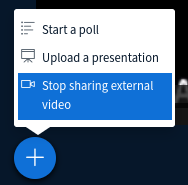
To remove the shared video, click on the big blue + button while video is displayed on the screen and select Stop sharing external video. Click on it and you will again see the default presentation.
Sharing the screen
A presenter can also share their screen by clicking on the Share your screen icon below the presentation.

When the browser's notification pops up select the screen you would like to share:
Mozilla Firefox users will only be able to choose between windows and screens.
Entire screen: shares whatever you are seeing, as you change applications and programs - with sharing entire screen you might show more than you want to (although it is handy when you are switching between multiple applications). Better option is to show only a specific window.
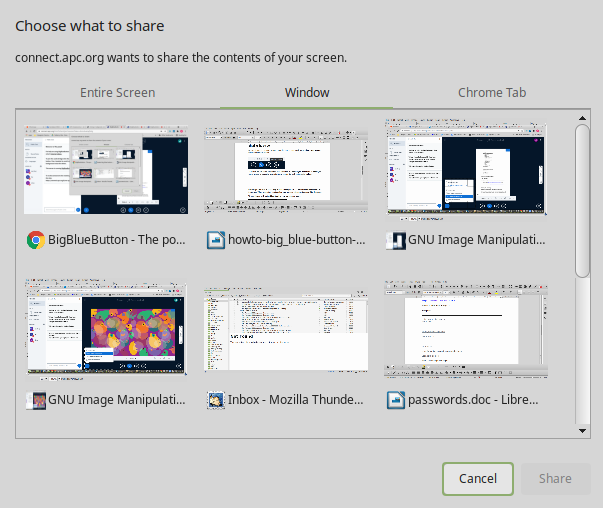
Window: shares a specific application window. If you move to other applications, other participants won't see them.Browser tab: shares a single specific tab in your browser. If you move to other applications or tabs, it does not affect what participants see. If you need to share sound, click at the bottom on "share tab audio"
Confirm your choice with a click on the button Share.
While BigBlueButton is connecting to your screen you will see an animation in the middle of the screen. When connection is established your selected window, tab or screen will be displayed to all participants.
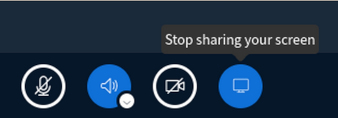
To stop sharing click on the Stop Sharing your screen icon.
Start a poll
You have to be the presenter in order to run a poll.
To create a poll click on the big blue + button and select Start a poll.
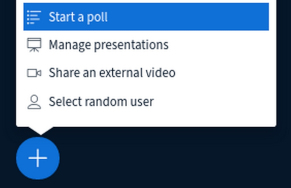
Next you will see a window with poll options. You can select one of the predefined polls or create a custom one.
- Enter a question text
- Select question type as True/False, ABCD (2 to 4 possible customizable answers), Yes/No/Abstention, and open ended (each participant can fill out their answer in free text)
- When you are ready to show the poll click on Start Poll
- Each participant will get a notification to answer the poll. You will be able to monitor the answers
- When the poll has ended select Publish polling results and all participants will be able to see them in chat.
BigBlueButton can detect when a question is being posed in a presentation and provides an automated quick polling option to the presenter. For more info check: BigBlueButton support article - Use Polling in BigBlueButton
Breakout rooms
You have to be a moderator to create and manage breakout rooms. Breakout rooms can be created by clicking on the gear icon next to Users list header and selecting Create breakout rooms.
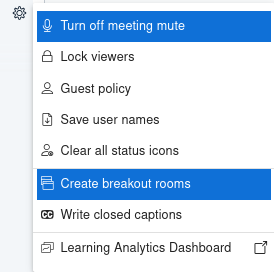
When you enter this menu you cannot manage any other option in BigBlueButton until you finalize or cancel the breakout rooms, i.e. you cannot unmute yourself, nor see the chat. So we suggest you open another tab to create breakout rooms.*
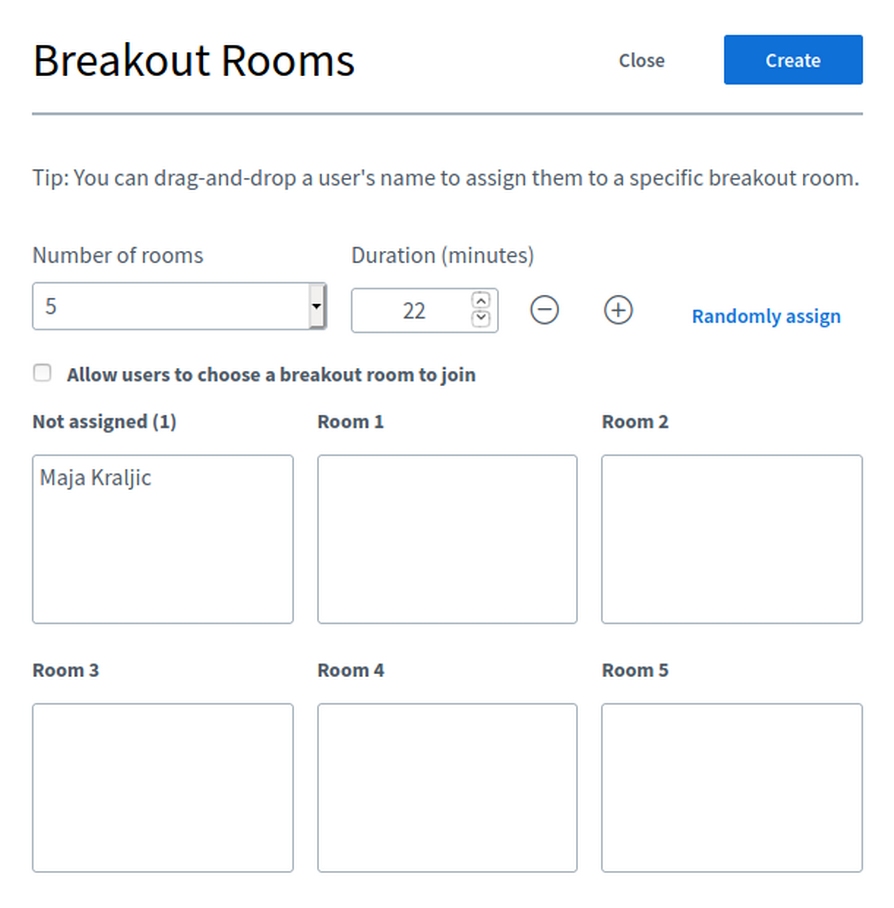
Next select the number of rooms you would like to create (between 2 and 16) and assign users to them.
You can drag and drop the participants' names, randomly assign them to rooms OR let each participant choose the room that they want to join. If necessary, breakout rooms can be renamed.
You cannot assign people randomly to rooms if more than one participant is a moderator!*
You will also need to define the duration of breakout - it is possible to extend the duration of the breakout rooms after they are created, more on this below.
Confirm the settings and open the breakout rooms by clicking Create button.
The participants will get a notification to join the breakout room.

This action will open a new tab in their browser and mute them in the main room. When participants join the breakout rooms they will see a notification about remaining time on top of the window.

Participants will also see the last content on the screen shown in their main room screen (for example if it was a presentation they will see the slide that was last shown in the main room).
The first participant to join the breakout room will have the presenter role.
Breakout rooms can not be recorded.
 The presenter who created breakout rooms will remain in the main space and will see the remaining time and interface for managing breakout rooms.
If necessary, the duration of breakout rooms can be extended by clicking on the + icon next to the duration countdown.
Any moderator can also join any room and move around, as well as join with audio only.
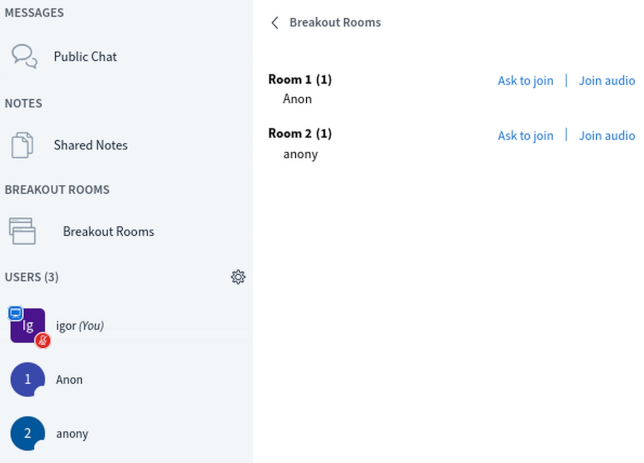 In the main room on the users' list all participants' icons get a number indicating which room they are in.
Participants can be called back to the main room by the Presenter, or can return by leaving their breakout room, which will bring them back to the main room.
Breakout rooms can end abruptly, even before the warning countdown is done. It's important to save/copy notes, especially since breakout rooms cannot be recorded.*
You can send private messages to participants in breakout rooms from the main room.
More detailed info at: https://support.blindsidenetworks.com/hc/en-us/articles/360024516512-Create-and-manage-breakout-rooms
Chat
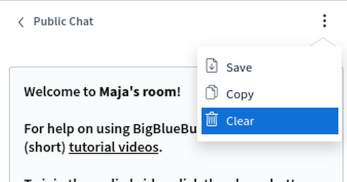
You can clear the chat by selecting menu in the top right corner of the chat and clicking on Clear.
In the same drop-down you will also see the options to save the chat (in .txt format) or copy the contents (to the clipboard).
The room's chat is also saved if the meeting is recorded.
Notes
Notes are a convenient way to add text and co-edit it with all participants. All participants can write and delete content in the notes.
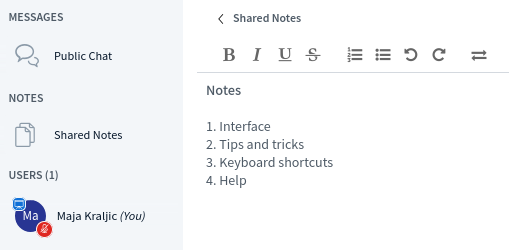
At any time notes can be exported and saved (click on arrows icon and select the format).
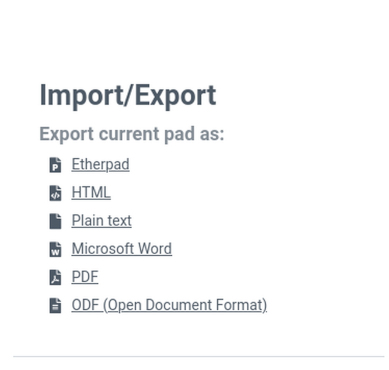
If you are recording the session, notes are automatically saved.
If you are in a breakout room, save your notes before the room automatically closes - breakout rooms cannot be recorded so if you don't save your notes in a breakout room, you can lose them.
Locking participants
BigBlueButton offers a few options to restrict what viewers may do in a room. These settings can be found in the gear icon under the name Lock viewers.
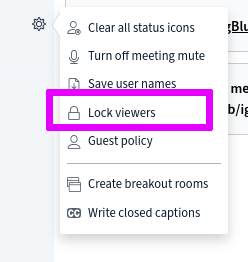
Once the menu opens you will be able to choose which of the features will be available for the participants. The available options available are:
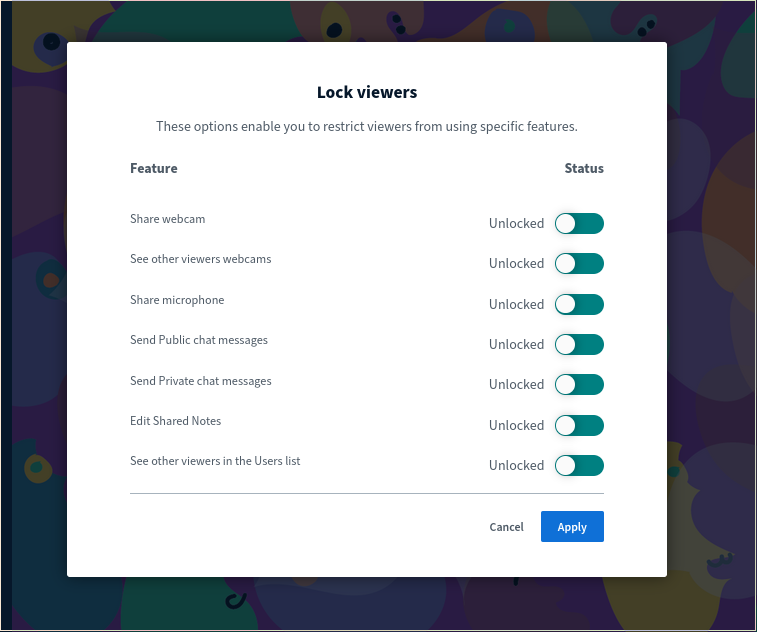
The options are very self-explanatory, and can improve greatly the security in the room when needed. These settings can be tweaked mid-session and it will affect users already in the room as well as participants joining afterward.
Locking users can be a bit complex and it is important to note a few things:
- Moderators are not affected and will still be able to use/access all features
- Participants will still be able to send private messages to moderators when private chat is restricted (although BigBlueButton support says otherwise)
- Although unlocking can be done mid-session (for individual users or everyone), participants might need to reconnect audio in order to speak.
- After unlocking an individual user, when locking them again, all locking configurations will take effect again for this user
- Unlocking does not always take effect immediately, it is a good idea to think very carefully what will be the restrictions for a room beforehand to avoid having unintended locking of participants.
End the meeting
To end the meeting you can simply close the browser's tab or window. If you are the moderator end the meeting by opening the menu in the top right corner of the room and selecting End meeting.
If documentation from the meeting is needed, remember to save the chat, participant list and notes before the meeting is ended.
If you recorded the meeting, the recording will be available after a few minutes in your room home screen. The actual time it takes to process and show the recording on your room home screen depends on the duration of the meeting and server load, please be patient. The recording will be available in a 'Presentation' format which can be viewed directly in the browser and a mp4 version that can also be viewed in the browser or downloaded. To download the mp4 version, open it on your browser and once the video has loaded, right-click anywhere and the video and select 'Save Video As...'. When a meeting is recorded the chat and notes will be saved automatically as well.
Learning analytics
A new section available to moderators allows them to see some stats on the meeting by accessing Learning Analytics Dashboard from the gear menu.
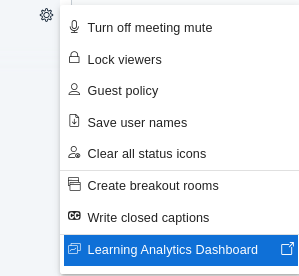
A new tab will open and display the session participation statistics.
Closed captioning
Meeting moderators can enable close captioning in the meeting.
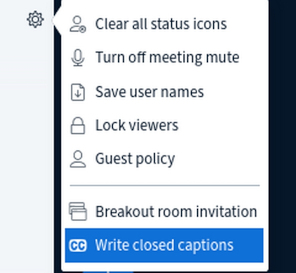
Select the gear icon and Write close captions. Then select the language.
As you type, participants who enable CC on their BigBlueButton will be able to see the captions.
Several people can take turns writing closed captions in the same language.
Interpretation on BigBlueButton
Meeting organizers can setup and manage interpretation in several languages. You have to be a moderator in order to activate it.
Activate interpretation
To start interpretation, click Languages in the sidebar.

Then add the name(s) of language(s) and click confirm.
You can define the speech volume level threshold for interpreter audio input from -100 to 0. The default is -70 and you can leave it as it is.

Increase this number to: 0 means always off
- Decrease this number to: -100 always on, useful for extremely noisy environments.
When you are ready, select Start interpretation.
Participants will see a new world icon that allows them to select any of the interpreted languages.
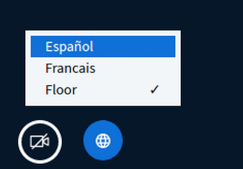
Assign interpreters
In order to assign interpreters, please first promote them to moderators by clicking on their names in the left hand bar, and then selecting Promote to moderator.
When they are moderators, they will see a new, purple button to the far right of the bottom menu. They can each select the language they want to interpret into.
When they are interpreting, their mic icon is violet (instead of the normal blue of participants).

Interpretation tips
- Testing interpreters well in advance of the session is really important so they could adjust their microphones and be familiar with the setup.
- When interpreters switch languages it takes a moment, so it is important that speakers notify in which languages they speak, and pause to give time for interpreters to adjust.
- Also, because sometimes the interpreter was listening to relay interpretation (eg. PG to ES to EN) then there was a delay in hearing the interpretation, this also requires a bit more patience and slower speed.
- Problem one: Interpreter voice transmitting on main audio - If you are hearing your interpreter on the FLOOR - please make note verbally in the session - go ahead and say you are hearing the speaker and the interpreter on the floor. You can do this in the chat but they might not see it. (That alert should be enough for them to realize that their mic is not PURPLE and therefor they are transmitting in the main room and not to an interpreter channel.)
- Problem two: Interpreter volume vis-a-vis speaker volume: If everyone else but you is hearing the interpreter fine in their channel but YOU are not, and your volume slider is not working, try going back to FLOOR above the blue globe icon, and then back to the channel you are listening to. If this does not work, disconnect your audio from the session and come back and try again.
1Useful slide to share at events
xxxxxxxxxx11EN When interpretation is enabled a blue "globe" icon appears on the bottom menu of the screen. If you wish to hear an interpretation, click this icon and select the language.
xxxxxxxxxx11ES Cuando la interpretación está activada, aparece un icono azul en forma de "globo" en el menú de la parte inferior de la pantalla. Si desea escuchar una interpretación, pulse este icono y seleccione el idioma.
xxxxxxxxxx11FR Lorsque l'interprétation est activée, une icône bleue "globe" apparaît dans le menu en bas de l'écran. Si vous souhaitez entendre une interprétation, cliquez sur cette icône et sélectionnez la langue.
xxxxxxxxxx11PT Quando a interpretação é habilitada, um ícone azul "globo" aparece no menu na parte inferior da tela. Se você deseja ouvir uma interpretação, clique neste ícone e selecione o idioma.
xxxxxxxxxx11EN When an interpreted language is chosen, a new slider control will appear on the left menu, above the list of participants. The slider allows you to control the volume of the original audio compared to interpretation. Move the slider to the right to increase the volume of interpretation.
xxxxxxxxxx11ES Cuando se elige un idioma de interpretación, aparece un nuevo control deslizante en el menú de la izquierda, encima de la lista de participantes. El control deslizante permite controlar el volumen del audio original en comparación con la interpretación. Mueva el control deslizante hacia la derecha para aumentar el volumen de la interpretación.
xxxxxxxxxx11FR Lorsqu'une langue interprétée est choisie, une nouvelle commande à curseur apparaît dans le menu de gauche, au-dessus de la liste des participants. Le curseur vous permet de contrôler le volume de l'audio original par rapport à l'interprétation. Déplacez le curseur vers la droite pour augmenter le volume de l'interprétation.
xxxxxxxxxx11PT Quando um idioma interpretado for escolhido, um novo controle deslizante aparecerá no menu à esquerda, acima da lista de participantes. O controle deslizante permite controlar o volume do áudio original em comparação com a interpretação. Mova o controle deslizante para a direita para aumentar o volume da interpretação.
xxxxxxxxxx11Use BigBlueButton as an interpreter
xxxxxxxxxx11When you are an interpreter in a meeting, you have to be given moderator role.
xxxxxxxxxx11Once interpretation is started, you will see a new button at the bottom of your screen.

xxxxxxxxxx11By clicking on it you can select the language you want to interpret into.
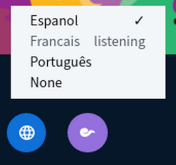
xxxxxxxxxx11You can provide interpretation from the original "floor" audio or you can use the interpretation "globe" icon to provide relay, by listening to another interpreter channel.
xxxxxxxxxx11The purple icon determines which language channel you will be transmitting your interpretation to. The blue globe determines which audio channel you will listen to in order to provide interpretation.
xxxxxxxxxx11On the left hand bar you can also see a new menu item that allows you to balance the sound of the interpretation vs the original language.

xxxxxxxxxx11When you are interpreting, your mic icon is violet (instead of the blue which all participants see).

xxxxxxxxxx11If the language on the original audio changes and you need to interpret to another language, you must change the selection on the purple interpretation icon.*
xxxxxxxxxx11If you are doing interpretation and you make a pause and don't speak, your audience will hear sound from the floor. This can be avoided if you select -100 in your **"Speech detection threshold` setup.
xxxxxxxxxx11Annex
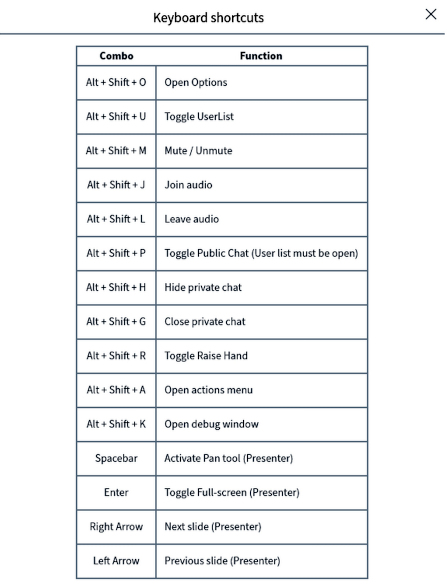
xxxxxxxxxx11Keyboard shortcuts
Use BigBlueButton on mobile devices
The BigBlueButton client also runs on mobile devices (you don't need to install any app). When using an iPad or iPhone, BigBlueButton runs within the default Safari Mobile browser (iOS 12.2+). When using an Android device, BigBlueButton recommends using Chrome browser (Android 6.0+).
Common issues and problems
- No sound or they don't hear you: Click on the headset icon and select another microphone & speaker.
- No sound when logging in (incompatible SDP): Update browser to the latest version or use another browser.
- Back arrow: It is quite common to hit the back button on your browser and leave the session. Just enter the link again to reconnect. Refreshing the page won't work.
- Joining a room early: If you join a room early and your screen is not refreshed (ie. the computer locked itself automatically) you might not see when others join. Reconnect with the meeting link.
- If you have the uBlock Origin plugin in your browser, with the option "Prevent WebRTC from leaking local IP addresses" switched on, it will not enable you to connect to BigBlueButton at all.
- VPNs can cause issues. If you are not able to connect audio and get the error "Failure on Call "reason = Incompatible SDP (error 1004)" or "Failure on Call reason=ICE error (error 1004)" please disconnect your VPN and use BBB without VPN.

- Some users report that they are unable to connect to BigBlueButton due to their own firewalls: if they are on a windows computer, please they need to change their firewall settings. Make sure to keep ports 16384-32768 open. In these cases connecting with VPN (for example Riseup VPN) can also help.
- Unchangable name: when you log in into BigBlueButton the name that will be visible in the room is your username. If you want to appear under another name there is no button to rename yourself. The workaround is to first open the room with your authenticated account and username and then open a new incognito window where you will join the room as regular non-authenticated user with your desired name. Once you have joined with both you can promoted the non-authenticated user to moderator with your authenticated user. After doing that you can close the window of the authenticated user.
Reporting issues
If you experienced problems while using BigBlueButton please report them to the the tech team at the BigBlueButton support channel in Mattermost.
More information
- BigBlueButton Official FAQ
- APC's Bigbluebutton Support channel
- BigBlueButton - What Changed in Version 2.4
- BigBlueButton Release Notes Version 2.4